How to Perspective Your Traffic
Keyword Traffic
The Keyword and key phrase confirming in Search
engines Statistics is a fantastic way to get understanding into what your
clients are
searching for and what your web page actually
rankings for.
How to Discover Which Search phrases Are
Being Used to Area on Your Site
The Keyword and key phrase confirming in Search
engines Statistics is a fantastic way to get understanding into what your
clients are
searching for and what your web page actually
rankings for.
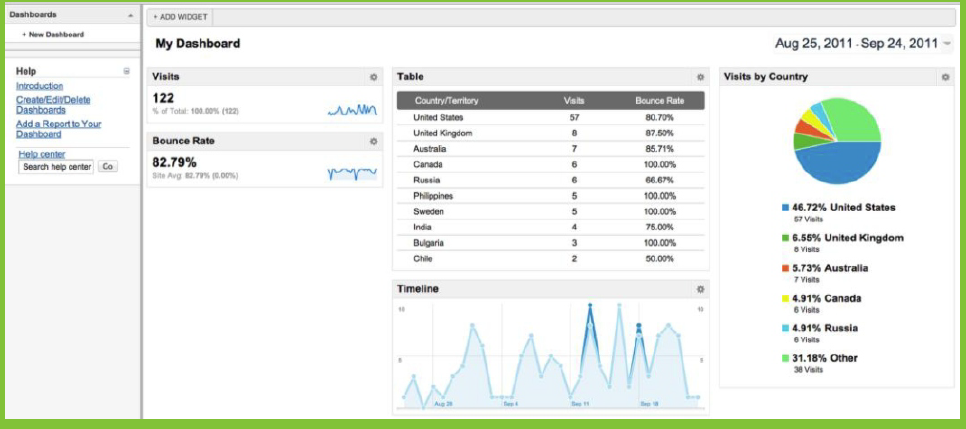
1. From your Google
Analytics Dashboard, find the “Traffic” tab on the left hand navigation bar and
click it
2. From the drop
down menu that appears choose “Search”

1.
From
that drop down menu choose "Organic".

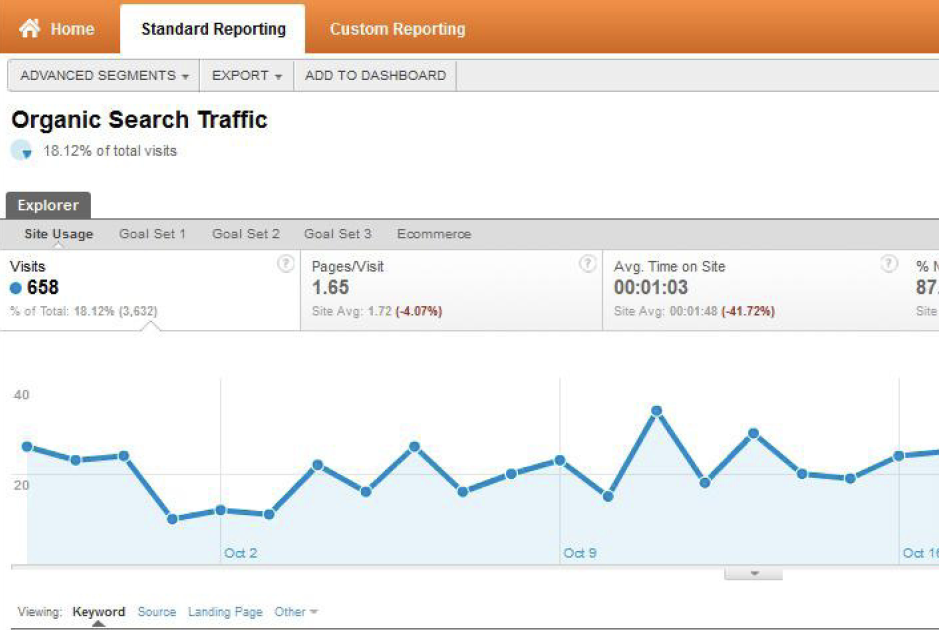
4.Your “Organic Look for Traffic” summary
allows you to search down to discover all the keywords and words that are
sending visitors to your site.
Once you have access to your Keywords you
can evaluate which keywords and words are actually delivering visitors to your
web page. You can look for particular keywords and words or remove a particular
word from your results. You can even apply your Innovative Section for
Unbranded Natural Visitors see the keywords and terms that contain no labeled
keywords.
Now that you will discover all the
keywords and terms that are delivering visitors to your web page, do you see
anything that surprises you? Is there an unusual or amazing keyword and key
word that is delivering visitors to your website? If there is, this is where
you should take advantage of possibilities that you might not have known
persisted.
Goallllllllllls!!!! and Events
“If it can’t be measured, it can’t be managed.” Measuring
should be at the heart of your marketing efforts. If what you are doing can’t
be measured, it can’t be managed; thus it can’t be improved.
Luckily Google Analytics offers many ways to measure
your different marketing efforts. Two great ways to
measure involve utilizing Goals and Events
Let’s look at goals first.
Goals are ways you can measure conversions on your
website. Google Analytics will track three basic
types of goals:
·
Time
on site - A goal is completed once a user spends a specified amount of time on
the website.
·
URL
Destination - A goal is completed once a user reaches a certain destination.
·
Pages/Visits
- A goal is completed once a user visits a certain number of pages.
There are lots of creative ways you can use these goals
to measure conversions on your website; however, the
best way is to utilize the URL destination style goal. It allows you to record
a conversion when a user lands on a specific page. This page
can vary depending on what you consider a conversion. Let‘s use an example
to demonstrate how to set up and measure a URL Destination Goal.
Setting Up a URL Destination
Goal
First you need to pick a conversion point to measure.
This can be a subscription to your blog,
newsletter, etc. The only requirement to your goal is
that it have a URL that is associated with the
goals completion.
For example,
1
www.homepage.com ---->
www.homepage.com/ email_sign_up ---->
“/thank_you_for_signing_up” is the goal completion page
and will be your URL Destination when
you‘re setting up your goal.
Once you’ve got your conversion and destination URL
figured out you can move on to setting up the
actual goal in Google Analytics.
Head over to your Account Home for Google Analytics and
access your desired account.
Once you’re in your account dashboard click the settings
wheel symbol in the upper right hand corner.
2
3
In your settings select the Goals Tab from the Profiles
Tab and hit “+Goal”
Now it’s time to fill in the details of your Goal. First
give your Goal a proper name so that you can
recognize it. For our example I am going to name it “Email
Sign Up” and designate whether you to
have the Goal active as soon as you‘re done setting it
up, or if you‘d rather active it later.
Next we’re going to select URL Destination for the Goal
Type.
Now we need to enter the Goal URL. For our example the
Goal URL is /thank_you_for_signing_up.
You do not need to enter the root domain for the Goal
URL only everything after the “/”.
Next we’re going to decide on a Match Type. For our
purposes we are going to choose Exact Match.
Leave “Case Sensitive” unchecked. When you set up your
own Goals you will need to figure out if your
URLs are case sensitive and adjust that setting
accordingly.
We can now give a value to this Goal. A value can be
anything you want, but it should be something
that is meaningful to your conversion process. For
example, if we know that the average worth of a
user who completes an email sign up is $15 we can assign
the value 15. This isn‘t a required step, so
you can choose to skip it if you like.
Next you have the option to include a Funnel. They are
very useful if you have multiple steps in your
conversion process but for the purpose of this example
we don‘t need to set up a Funnel.
Hit save, and you’re set to go.
Google Analytics should now register a completed Goal
anytime anyone hits the Thank You page, and
if the only way to hit the Thank You page is to
subscribe then your completed goals should reflect the
number of people who subscribe.
As you can image there are many goal opportunities
awaiting you. Now that you have a basic
understanding of how to set up a goal let’s discuss the
types of goals you should be measuring.
What Goals Should I Set Up
for my Business?
With so many options as to what you can track as a goal
and a limited amount of allowed goals (you’re allowed
roughly 20 goals per account) you’ll need to be careful to track key metrics
that are important to your business.
Before we discuss what you should track, let me first
say that every business is different and there are
different micro goals that your business should focus
on.
You should ask yourself some important questions when
determining your goals like:
·
What
can I measure that is important to my business?
·
What
are my most important conversion points?
·
Do I have multi-step conversions?
Take
a look at an example of the rule you'll be working with
.
_trackEvent(category,
activity, opt_label, opt_value)
Here
are the factors you will be working with and what they mean.
Category
(required)
The
name you provide for the number of things you want to monitor.
Action
(required)
A
sequence that is exclusively combined with each classification, and widely used
to determine the kind of user
interaction
for the web item.
Label
(required)
An
optionally available sequence to offer extra measurements to the occasion
information.
Value
(required)
An
integer that you can use to offer mathematical information about the customer
occasion.
First,
you need to choose what you want to monitor as a meeting. In our situation
we’re going monitor mouse clicks to our
Twitter
web page. The transformation would perform this way from the user‘s end:
From
the returning end it will look like this:
Setting
Up Event Tracking
www.homepage.com
- > customer mouse clicks “Check Out My Twitter” -> customer is taken to
my Tweets page
www.homepage.com
----> customer mouse clicks “Check Out My Twitter” ---->
the
occasion is activated and documented in Search engines Statistics ----> User
is taken to my Tweets page
So,
let us see how this is set up, step-by-step.
We need to edit our tracking code to incorporate our parameters for
tracking this event so I will need
to include a category
and action and optionally a label
or value. For the category
I am going to
use ‘Twitter’, for the action I am going to use ‘Went to Twitter Page’,
and for the label I will use
‘Social’.
So, my code looks like this,
(['_trackEvent',
'Twitter', 'Went to Twitter Page', 'Social']);
Now that I’ve got Javascript code figured out I need to apply it to
the event on my website. To do this I need to access the html of my website for the
page where the event is located.
Once I find the right piece of code for my event in my html I will
apply this Javascript snippet to
it, like this,
<a href=
target="_blank"
">Check Out My
Twitter</a>
“https://Twitter.com/neilpatel"
onclick="_gaq.push(['_trackEvent',
'Twitter', 'Went To Twitter Page',
'Social']);
The black text is the original link and the red text is the added
event track code.
You event is now being tracked using Event Tracking in Google
Analytics. You can now apply this
method to any clickable action on your website.
Advanced Segments
Advanced Segments are one of the best tools to utilize in Google
Analytics for breaking down and
focusing in on specific metrics that are key to your performance.
Advanced Segments allow you to segment certain types of visits to your
website so that you can focus on
what really matters in terms of measuring your performance. Google
provides you with a number of
predetermined Advanced Segments, which can be useful, but the true
power of Advanced Segments is
learning how they work and creating your own that are unique to your
goals and needs.
How Do Advanced Segments Work?
Advanced Segments work through Google Analytics filtering out
segmented data based on filters you put
into place using the Advanced Segment tool. When you apply an Advanced
Segment, Google will only
display data that meets that criteria. For example, if you apply the “New
Visits” Advanced Segment,
Google will only display data based on visitors that Google records as
new and exclude all data that
doesn’t fit the “New Visits” criteria.
Right out of the box Google provides you with a long list of ready to
go Advanced Segments. You should
access the following Advanced Segments that are provided for you:
· All Visits
·
New Visits
·
Returning Visits
·
Paid Search Traffic
·
Non-Paid Traffic
·
Search Traffic
·
Direct Traffic
·
Referral Traffic
·
Visits with Conversions
·
Visits with Transactions
·
Mobile Traffic
· Non-Bounce Traffic
What Kind of Data Should I Segment?
Since your options are virtually endless for
the types of segments you can create I will give you one that
you need to create right now before you move on
and start creating your own. This Advanced Segment
will isolate visits that have come to your
website via organic search using keywords that contain no
branded terms.
Why is this segment important? Great question.
Well this powerful Advanced Segment is going to show
us how many people are not specifically
searching for your website or your brand but are finding your
site using specific keyword phrases. This is a
great way to see what kind of keywords people are
searching for and which keywords your website
ranks for.
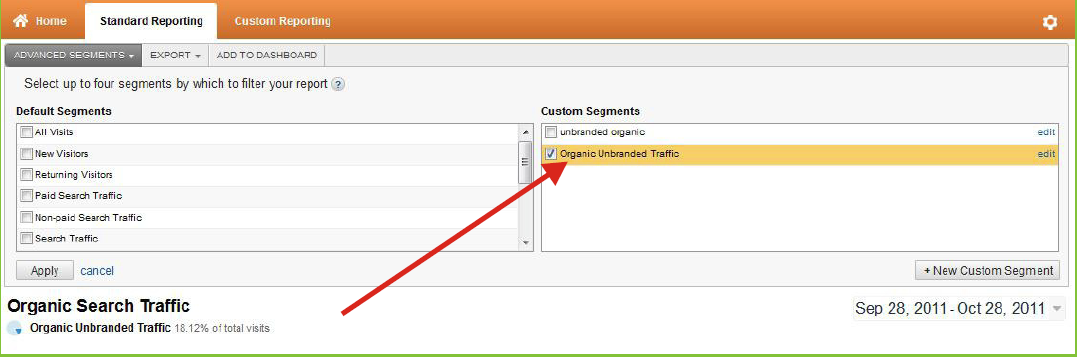
Setting Up the Organic Unbranded Advanced
Segment
To create the Organic Unbranded Advanced Segment follow these simple
steps:
Navigate to your GA Dashboard
Click on the “Standard Reporting” tab at the top of the page.
You will now find all of your Custom Advanced Segments. Check
mark "Organic Branded Traffic".
No comments:
Post a Comment